What’s up guys this is Harshith and in this article, I am going to show how you can set up WordPress using NGINX.
Prerequisites
- Knowledge about basic Linux Commands
- A server (A VM will do)
First Install the dependencies required for Nginx to run
sudo apt install nginxThen install PHP and its dependencies
sudo apt install php-fpm php-mysql php-curl php-gd php-intl php-mbstring php-soap php-xml php-xmlrpc php-zipWe will also need MySQL to act as a Database
sudo apt install mysql-serveropen MySQL using
sudo mysqlThen create a database and User and grant all the rights to the user
mysql> CREATE DATABASE {wordpress} DEFAULT CHARACTER SET utf8 COLLATE utf8_unicode_ci;
mysql> CREATE USER '{wordpressuser}'@'{localhost}' IDENTIFIED BY '{password}';
mysql> GRANT ALL ON {wordpress}.* TO '{wordpressuser}'@'localhost';
mysql> exit;
After this navigate to
cd /etc/nginx/sites-available
and create a new file without any extension using sudo nano {wp1}
and add the following
server {
 listen 8090 default_server;
 listen [::]:8090 default_server;
 root /var/www/wp1;
 index index.php;

 server_name _;

 location / {
  try_files $uri $uri/ /index.php;
 }

 # pass PHP scripts to FastCGI server

 location ~ \.php$ {
  include snippets/fastcgi-php.conf;
  fastcgi_pass unix:/var/run/php/php7.4-fpm.sock;
 }

 location ~ /\.ht {
  deny all;
 }
}
Here we are specifying /var/www/wp1 as our folder where the wordpress config files live
Here we are specifying /var/www/wp1 as our folder where the wordpress config files live
But the folder doesn’t exist yet and it can be created using
cd /var/wwwand then download the WordPress folder from
https://wordpress.org/latest.tar.gz
We can also download the Archive using a web browser but I will be using wget
sudo wget https://wordpress.org/latest.tar.gzwhen you list the files inside the folder using ls
You will see the file latest.tar.gz
create a new folder and extract the archive using
sudo tar -xzvf ../latest.tar.gz ./ --strip-components=1The --strip-components=1 flag is to extract the archive without including the root folder of the archive, here wordpress
Now copy the wp-config-sample.php to a new file
called wp-config.php using
sudo cp ./wp-config-sample.php ./wp-config.phpthen You will need to update the values inside wp-config.php with the database name, username, password
/** The name of the database for WordPress */
define( 'DB_NAME', 'wp_db' );

/** MySQL database username */
define( 'DB_USER', 'wp_db_admin' );

/** MySQL database password */
define( 'DB_PASSWORD', 'notPassword' );

/** MySQL hostname */
define( 'DB_HOST', 'localhost' );

/** Database charset to use in creating database tables. */
define( 'DB_CHARSET', 'utf8' );

/** The database collate type. Don\'t change this if in doubt. */
define( 'DB_COLLATE', '' );
Then copy the content from https://api.wordpress.org/secret-key/1.1/salt/ and update it here
define( 'AUTH_KEY',         'put your unique phrase here' );
define( 'SECURE_AUTH_KEY',  'put your unique phrase here' );
define( 'LOGGED_IN_KEY',    'put your unique phrase here' );
define( 'NONCE_KEY',        'put your unique phrase here' );
define( 'AUTH_SALT',        'put your unique phrase here' );
define( 'SECURE_AUTH_SALT', 'put your unique phrase here' );
define( 'LOGGED_IN_SALT',   'put your unique phrase here' );
define( 'NONCE_SALT',       'put your unique phrase here' );
The below addition will enable you to create files as a user
define('FS_METHOD', 'direct');Now we need to fix the permissions of the folder using this command
sudo chown -R www-data:www-data ./*Make sure to execute this inside the WordPress folder
The -R flag is to set the permissions to be recursive and affect all sub-folders
Then change the Read/Write permission to
sudo chmod -R 755 ./*Now let’s go back to the NGINX config folder
cd /etc/nginx/site-availablesites-enabled
To do that execute the following
sudo ln -s /etc/nginx/sites-enabled/wp1 /etc/nginx/sites-available/wp1sudo ln -s ./wp1 ../sites-enabled/wp1 this is not recommended
Now check if the config file is valid using
sudo nginx -tOutput →
nginx: the configuration file /etc/nginx/nginx.conf syntax is ok
nginx: configuration file /etc/nginx/nginx.conf test is successful
then reload the NGINX service using
sudo systemctl restart nginx.servicethen go to your web browser and open the website

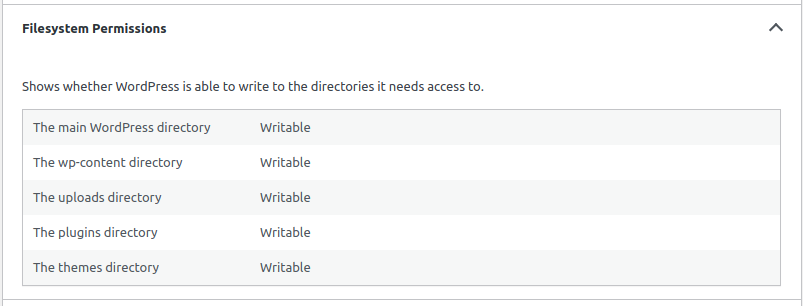
That’s All! If you want to know if the permissions are working go to the Dashboard and view it under Site health under the Info Tab